

Are you wondering how to prepare the soil for planting, ensuring their garden flourishes?
It's important.
Preparing the soil properly is the cornerstone of successful gardening. This process enhances plant growth and increases yields.
Testing Soil Quality
Before embarking on their planting journey, they should assess the quality of their soil meticulously.
Conducting a soil test helps understand nutrient levels essential for plant growth.
They can obtain a comprehensive soil test kit from a local garden centre or agricultural extension office, providing crucial insights into pH levels, nutrient deficiencies, and microbial activity.
With the results, they can make informed decisions on necessary soil amendments to optimise conditions for their plants to thrive, transforming their garden into a vibrant oasis. Correcting imbalances may involve adding organic matter, fertilisers, or lime to adjust pH, ensuring a fertile bed for robust plant growth.
Choosing the Right Soil Type
When choosing the right soil type, gardeners must consider various factors to ensure their plants thrive.
Primarily, it is about understanding the specific needs of each plant species and matching those requirements to the soil characteristics. Whether they are growing vegetables, flowering plants, or shrubs, selecting a compatible soil type can make all the difference in achieving productive results.
Generally, soil can be categorised into clay, loamy, and sandy types, and our guide to soil types and how to identify them includes a simple jar test you can run at home. By knowing their soil type, gardeners can better manage water retention, nutrient availability, and root growth, tailored specifically to their plant's unique needs.
Ultimately, selecting the right soil type is crucial for establishing a healthy garden environment. This foundational step will contribute significantly to the overall success of their planting endeavours, providing an excellent start towards a flourishing garden filled with vigorous, thriving plants.
Removing Weeds and Debris
Before starting to plant, clearing the soil of weeds, rocks, litter, and old plant material is crucial. Removing said obstacles ensures healthier plant growth by eliminating competition for vital resources.
Proper preparation necessitates thorough weeding and cleaning; a well-prepared soil fosters optimal plant development.
Gardeners should begin by meticulously extracting all visible weeds, taking care to pull out roots to prevent regrowth. Hand weeding, though time-consuming, is particularly effective for smaller plots. When tackling larger areas or persistent weeds, employing tools such as a hoe or a weed puller can be beneficial.
Additionally, clearing debris from the soil, including twigs and leftover foliage, reduces the likelihood of pests and diseases infiltrating new plants. Such proactive measures set the stage for a more resilient garden ecosystem.
By diligently executing these preparatory steps, gardeners create an inviting and fertile canvas for planting. Ultimately, this meticulous groundwork lays a robust foundation for their gardens, ensuring a thriving and vibrant space for plants to flourish.
Tilling the Soil
Tilling the soil plays a crucial role, serving as a foundational step to ensure successful planting and robust growth.
Firstly, it helps aerate the soil, creating a suitable environment for root expansion and health. Go carefully, though: excessive digging destroys the fungal networks and earthworm burrows that hold good soil together. This process also mixes nutrients uniformly, ensuring all parts of the soil are enriched and ready for new plants. Gardeners should aim to till the soil deeply enough to break up compacted areas.
Proper tilling contributes substantially to improving soil structure. It facilitates effective water drainage, preventing root rot and other moisture-related issues. Moreover, tilled soil enhances the efficacy of subsequent fertilisation, ensuring nutrients penetrate deeply and evenly.
For the best results, gardeners might opt for mechanical tillers or traditional hand tools, depending on the garden size. Regardless of the method, consistently practising thoughtful tilling elevates the garden's capacity to support plant life, fostering resilience, abundant growth, and ultimately contributing to a thriving landscape.
Adding Organic Matter
Adding organic matter is one of the most crucial steps in soil preparation. But why is it so essential?
In 2016, a comprehensive study by leading agricultural scientists revealed that incorporating organic matter significantly boosts soil fertility, improves structure, and enhances water retention. These benefits create an optimum environment for plant roots to thrive.
Now, it's not just about tossing some compost in; there's a strategy to maximise the benefits. One should aim to add a layer of organic matter in autumn, giving it time to break down and enrich the soil before the spring planting season.
Compost, aged manure, and green manures are excellent choices. Each of these options brings unique nutrients and benefits to the soil, contributing to a more balanced and fertile growing medium. Consistent addition will see the soil structure improving year by year.
Ultimately, organic matter transforms inert soil into a dynamic, living ecosystem. So, why not start today?
Incorporating Compost
Incorporating compost into the soil is a game-changer for any garden.
Nutrient-rich and full of life, compost offers unparalleled benefits. It not only enhances soil structure but also increases its water retention capabilities.
To begin, gardeners should spread a generous layer of compost, ideally about 5 centimetres thick. This layer can be gently mixed into the top 15 centimetres of soil using a garden fork.
The best time to incorporate compost is in early spring or late autumn. Consistent use will see the soil's colour turn darker and more crumbly, indicators of improved health.
Compost truly breathes life into soil, fostering an environment where plants can flourish.
Maintaining Proper Soil pH
Maintaining proper soil pH is paramount to the success of any planting endeavour.
Since 2016, research discoveries, like those undertaken at prominent Australian agricultural institutions, have revolutionised how experts approach soil conditioning, showcasing that soil pH plays a critical role in nutrient availability and plant health.
So, it’s essential that gardeners and farmers regularly test their soil's pH to ensure it falls within the optimal range for their specific plants. Most vegetables, flowers, and lawns thrive when the soil pH is between 6 and 7, depending on the species.
Lime or sulphur can be added to the soil to adjust its pH, and our guide on how to lower soil pH covers the acid-loving plants that need it most. While lime is used to raise the pH level, sulphur helps in lowering it; both amendments should be applied with careful consideration of the soil's current condition.
Optimising soil pH opens up the full spectrum of nutrients, creating a symbiotic relationship between plants and their environment.
Using Mulch for Soil Health
To enhance soil health, utilising mulch can be an effective strategy that yields excellent results for gardeners and farmers.
Mulch offers numerous benefits, acting as a protective barrier over the soil surface, conserving moisture, reducing weed growth, and regulating soil temperature which are crucial for plant health. When organic mulches, such as straw or bark, decompose, they enrich the soil with valuable nutrients necessary for robust plant growth.
Moreover, mulch plays a significant role in improving soil structure. As it breaks down, it promotes the development of humus, enhancing soil aeration, drainage, and water retention. This biological activity further supports essential microorganisms that contribute to a thriving ecosystem.
Ultimately, by incorporating mulch, individuals can create a sustainable gardening practice that maximises plant health and productivity. The added benefits of reduced irrigation needs, diminished weed infestation, and superior soil quality translate to a more efficient and effective planting process, fostering a flourishing environment for all types of plants.
Testing for Nutrient Deficiencies
Every garden needs proper nourishment.
Testing for nutrient deficiencies is an essential step. This process involves taking soil samples and having them analysed in a laboratory to determine specific nutrient levels, allowing one to make informed decisions about necessary soil amendments. Essentially, this can be the key to unlocking the full potential of one's garden and ensuring that plants receive the balanced diet they need for optimal growth.
Soil testing should be done regularly.
The best time to collect soil samples is before planting. This is because knowing exactly what nutrients are missing - or even in excess - helps gardeners tailor their amendments and fertilisation strategies pre-planting.
By identifying and addressing nutrient deficiencies early, gardeners can take proactive steps to enhance their soil's nutrient profile. This practice not only promotes healthier plant development but also reduces the likelihood of plant diseases, ultimately leading towards a lush and productive garden. Soil health is the cornerstone of sustainable agriculture, and making the effort to test and amend soil nutrient levels is a vital aspect of responsible gardening.
Applying Fertilisers Effectively
Applying fertilisers effectively hinges on understanding the specific nutrient needs of different plants throughout their growth cycle.
In 2016, Australian researchers, in a landmark study, highlighted how essential it is to align fertilisation practices with the specific requirements of various plants. Understanding these needs prompts more efficient nutrient uptake, leading to robust and vibrant growth.
Before applying any fertiliser, it’s crucial to read and follow the manufacturer's guidelines, ensuring the correct dosages are administered. Over-fertilisation can harm plants, while under-fertilisation can impede growth, making balance imperative.
Moreover, the timing of fertiliser application is critical. For most plants, applying fertilisers in the early morning or late afternoon, when temperatures are lower, prevents nutrient loss due to evaporation and ensures optimal absorption.
One must also consider the soil's current nutrient levels, using soil tests to guide fertiliser choices. This ensures nutrients are supplied accurately, fostering a thriving and bountiful garden.
Understanding Soil Erosion Prevention
Understanding soil erosion prevention is indispensable for ensuring sustainable and productive agricultural practices. Soil erosion can have devastating effects on the environment, leading to nutrient loss and reduced soil fertility.
Farmers and gardeners must employ effective strategies to mitigate soil erosion. This can include practices like contour ploughing.
Implementing such erosion control measures not only preserves valuable topsoil but also enhances water retention, providing a more stable environment for plant growth. Root systems benefit significantly, gaining a firmer anchor.
Furthermore, planting cover crops and maintaining organic ground cover are excellent long-term solutions to minimise soil erosion. These practices protect the soil surface from the erosive impact of rain and wind, thereby promoting a resilient, flourishing ecosystem. By maintaining these preventative measures, the soil remains a rich, vibrant foundation for all forms of plant life.
Ensuring Proper Drainage
Proper drainage within soil is essential for the healthy growth of plants. But why is it significant and how can one achieve optimal conditions?
In 2016, researchers at a renowned agricultural university discovered that poor drainage can hinder root development, leading to stunted growth. This underscores the need for proper drainage techniques.
Drainage allows excess water to escape, preventing waterlogged conditions that can damage plant roots and foster disease. An ideal balance promotes robust root systems and healthy plants.
To improve drainage, gardeners can amend their soil with organic matter like compost, which enhances soil structure. Another method includes creating raised beds, preventing water accumulation.
By incorporating these practices, they can ensure that their garden or farm is primed for successful, thriving plant life.
Rotating Crops
Rotating crops is a strategic farming practice that improves soil health and combats pests and diseases.
Since 2016, agricultural experts have recognised the immense benefits of rotating crops, particularly in sustainable farming systems. They have noted that alternating plant families in the same soil reduces disease prevalence and pest populations.
Moreover, it's not just about disease control; crop rotation significantly enhances soil fertility by balancing nutrient demands. Different plants extract and replenish varying nutrients, creating a more balanced and fertile soil environment year-round.
This method of varying the crops grown in an area from season to season ensures that the land remains productive. For instance, legumes can fix nitrogen, enriching the soil for future crops like corn or wheat.
By implementing rotation practices, farming and gardening enthusiasts can safeguard and enrich their soil's vitality.
Cover Cropping Benefits
Cover cropping is an exceptional technique that improves soil structure, manages weeds, and prevents soil erosion, all while promoting biodiversity.
There is overwhelming evidence supporting the efficacy of cover cropping.
Implementing cover crops like legumes, grasses, or brassicas adds organic matter to the soil. This organic matter enhances water retention, promotes beneficial soil microbes, and improves nutrient cycling, making the soil more productive, resilient, and fertile.
Furthermore, cover cropping offers the dual benefit of providing a protective layer to the soil during off-seasons, whilst simultaneously improving soil health and quality. It is an investment in sustainable agriculture, ensuring the soil remains viable and productive for future planting seasons. As James Webb, a seasoned agronomist, aptly states, "Cover crops are the unsung heroes of modern farming, ensuring long-term soil health and stability."
Protecting Soil with Ground Covers
Ground covers play a crucial role in preserving soil, preventing erosion, and maintaining a consistent temperature, fostering a sustainable gardening environment.
Ground covers provide an effective solution to soil degradation.
Mature ground cover plants create a natural barrier against erosion.
These plantings work to suppress weed growth effectively.
By retaining soil moisture, ground covers reduce the need for frequent watering, benefiting both the plants and the environment.
Ground covers such as clover or creeping thyme also add organic matter as they grow and decay, enhancing soil composition over time.
Indeed, incorporating ground covers is essential for any resilient, thriving garden. Their integration heralds a promising future in soil protection and health.
Avoiding Soil Compaction
One of the greatest detriments to soil health is compaction, which can severely limit plant growth.
In 2016, research indicated, a thoughtful approach towards garden management, particularly in avoiding compaction, was crucial. Compaction negatively impacts root expansion and water infiltration, ultimately disrupting the very essence of a thriving garden.
Thus, it’s of utmost importance that one refrains from walking on garden beds. Doing so compresses the soil particles, reducing pore space, which is essential for air and water movement, thus harming beneficial soil organisms.
Utilising wooden planks to distribute weight, creating dedicated paths, and employing raised beds are all excellent strategies that mitigate the risk of compaction. Such practices ensure that the soil remains friable and conducive to vigorous plant growth.
Avoiding soil compaction is a silent yet profound commitment to ensuring a garden's long-term prosperity.
Planning Seasonal Soil Care
Successful soil preparation requires year-round attention.
Planning for seasonal soil care is key to vibrant planting. This involves a comprehensive understanding of one's local climate and soil type, paired with the cyclical nature of plant growth. For instance, certain amendments may be best applied in the autumn, while others are optimal in spring.
Routine soil testing offers invaluable insights.
Adjustments based on test results ensure a balanced nutrient profile - not only does this promote robust plant health but it also minimises the wastage of resources like water and fertiliser.
The planning phase is enriched by considering intercropping strategies and crop rotation patterns, which have long been proven to enhance soil biodiversity. Additionally, addressing soil erosion through mulching techniques, and cover cropping enriches the soil, creating a resilient garden year after year.
How to Prepare the Soil for Planting in Raised Beds
Raised beds offer a remarkable solution for those eager to optimise their gardening experience and yield exceptional results.
To begin with, one must choose a location that receives ample sunlight, ensuring healthy plant growth. Once selected, the site should also be levelled to facilitate uniform drainage. This vital step guards against waterlogging and encourages roots to access essential nutrients.
For the raised bed structure, opt for materials such as untreated wood, bricks, or stones, which ensure longevity and eco-friendliness. It is imperative to measure the height correctly, as taller raised beds provide a deeper soil reservoir, enabling extensive root development.
Next, creating a nutrient-rich soil mix is crucial for the success of the raised bed. A quality mix typically includes a blend of garden soil, compost, and organic matter such as leaf mould or well-rotted manure. This combination ensures a well-drained yet moisture-retentive environment, key attributes for thriving plants. Integrating this mix properly results in a flourishing, bountiful garden.
How to improve soil quality
Preparing a bed once is a good start. Improving soil quality is the longer game, and it is what separates a garden that performs for a season from one that performs for a decade. The signs that your soil needs work are easy to spot: water pooling on the surface or draining away instantly, soil that feels hard, sticky or gritty, yellow or slow-growing plants, and an obvious absence of worms or insects when you turn a spadeful.
Work with heavy clay rather than against it
Clay is the dominant soil across much of Brisbane and south-east Queensland, and it defeats more gardeners than any other condition. It holds nutrients well but drains poorly, compacts under foot traffic and turns sticky in the wet and rock-hard in the dry.
The most effective treatment is gypsum, or calcium sulfate. Unlike lime it breaks apart clay particles without altering soil pH, which means you can use it freely without upsetting acid-loving plants nearby. Spread it over the surface at the rate on the bag, water it in, and repeat annually on badly structured ground. Coarse sand dug through the top 30 centimetres also helps, but only in combination with organic matter. Sand added to clay on its own can set like concrete and make the problem considerably worse.
Raised beds and mounded planting are the other reliable answer on clay. Lifting the root zone above the waterlogged layer solves the drainage problem outright rather than trying to re-engineer the whole profile.
Encourage earthworms
Earthworms are the cheapest soil conditioners available. They aerate the profile as they move, break down organic material into plant-available nutrients, improve both drainage and water retention, and leave behind castings that are richer than almost anything you can buy. A soil full of worms is, almost by definition, a healthy soil.
Attracting them is mostly a matter of not driving them away. Avoid digging more than you need to, keep the soil consistently moist rather than letting it bake dry, feed the surface with compost and mulch, and go easy on synthetic fertilisers and pesticides, which suppress worm populations along with everything else living in the soil.
A ten-step routine for tired soil
- Add organic matter. Compost, well-aged manure and worm castings dug through the top 10 to 20 centimetres, or applied as a top dressing for the worms to take down.
- Mulch to five to seven centimetres, kept clear of stems and trunks, using sugar cane, lucerne, bark or compost mulch.
- Treat clay with gypsum, and combine any sand with organic matter rather than using it alone.
- Avoid chemical overuse. Choose slow-release organic fertilisers, seaweed or fish emulsion for trace elements, and encourage natural predators instead of reaching for pesticides.
- Sow cover crops or green manure over bare patches between plantings, such as clover, lupins or field peas.
- Encourage earthworms by digging less, mulching more and keeping the soil moist.
- Test and adjust pH, aiming for roughly 6 to 7 for most vegetables, flowers and lawns.
- Rotate and diversify what you plant, and include nitrogen-fixing species such as beans, peas and wattles.
- Water deeply and less often to encourage deep roots, and never let the soil sit either soggy or bone dry.
- If you are starting fresh in beds or pots, buy a quality mix containing compost, perlite, coir and a slow-release fertiliser rather than the cheapest bag on the pallet.
Soil biology: the part you cannot see
Everything above works because of what is alive in the soil. Bacteria, fungi, protozoa and earthworms form a food web that decomposes organic residues, releases nutrients in forms roots can absorb, and actively suppresses many soil-borne pathogens. Mycorrhizal fungi in particular form partnerships with plant roots, extending their effective reach for water and phosphorus far beyond what the roots could manage alone.
Soil structure is the physical expression of that biology. Good structure means the mineral particles are bound into crumbs with air spaces between them, which is what allows water to drain, air to reach the roots and roots to push through. Organic matter is the glue that builds those crumbs, which is why compost improves both a sandy soil and a clay one: it adds water-holding capacity to the first and opens up the second.
The practical consequence is that feeding the soil beats feeding the plant. A garden built on living, well-structured soil needs less fertiliser, less water and fewer interventions each year, not more. Our guide to the science behind fertilisers explains how to supplement that biology rather than override it.
Soil preparation is one step of four. How to plant a new garden bed puts it in sequence with site assessment, planting and first-season care.
Preparing the soil you actually have
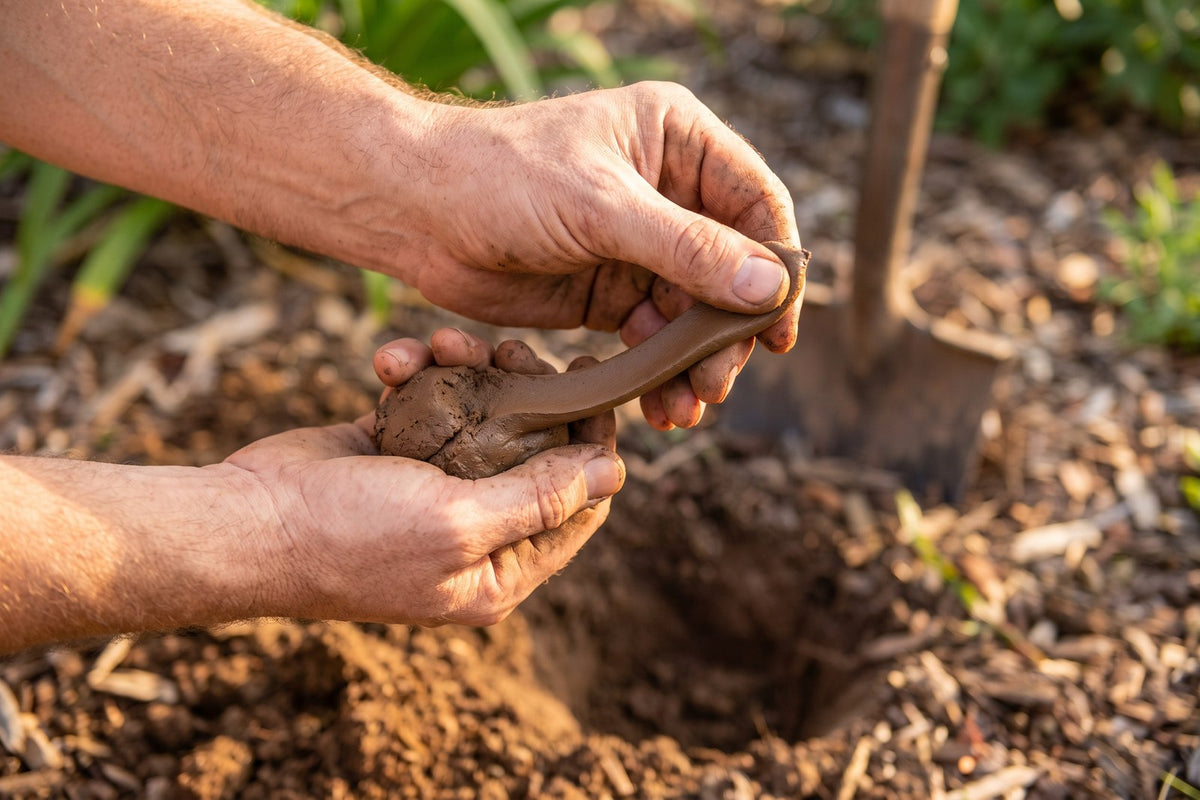
Australian soils are among the oldest and most weathered on earth, and preparation differs enormously depending on which type you are dealing with. Identify it first with the ribbon test - moisten a handful from 150 mm down and press it into a ribbon between thumb and forefinger. No ribbon means sand; over 50 mm means clay.
| Soil | Where | What preparation actually needs to do |
|---|---|---|
| Sand | Perth, Adelaide coast, much of coastal QLD and NSW | Add water and nutrient holding capacity |
| Clay | Brisbane, western Sydney, Melbourne, inland | Improve structure and drainage |
| Sandy loam | Many established suburbs | Maintain organic matter |
| Red volcanic | Atherton, Northern Rivers, Darling Downs | Very little - naturally fertile |
Clay: gypsum only if it will work
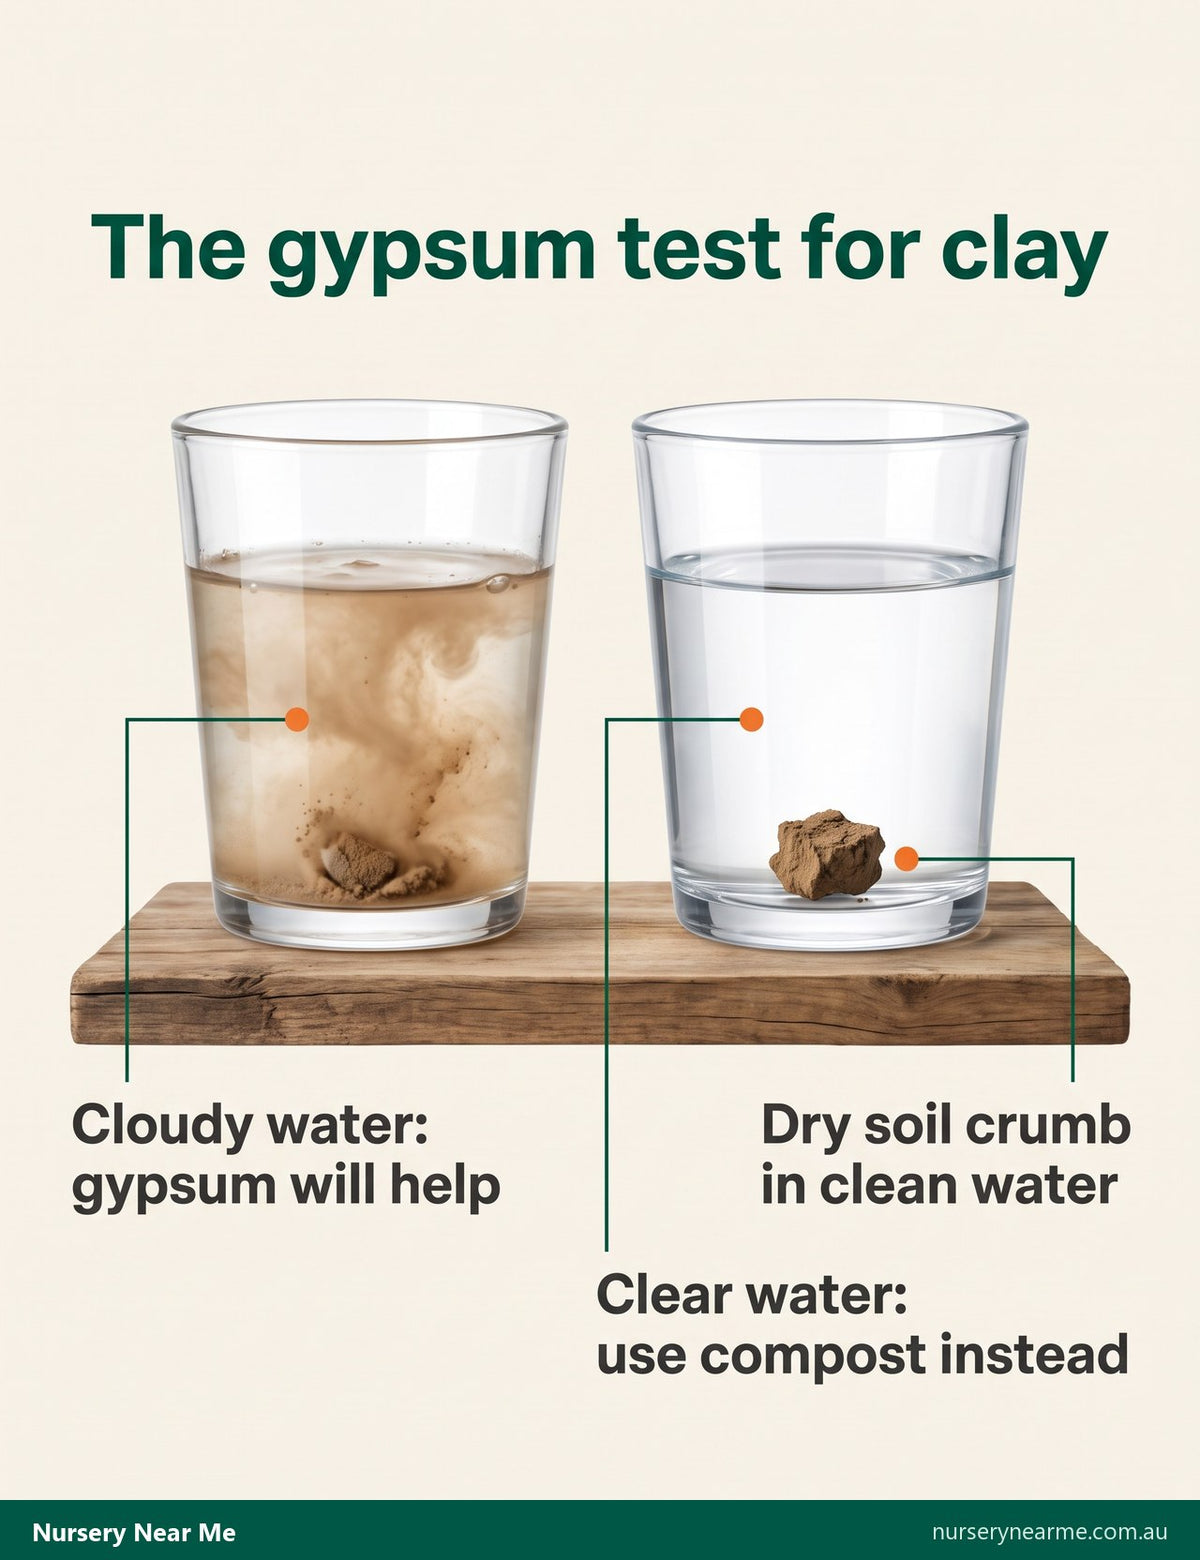
Gypsum is widely sold as a clay breaker and it only works on sodic clays. Test before buying it: drop a dry crumb of soil into a glass of clear water and leave it for a few hours. If the water clouds as the crumb disperses, the clay is sodic and gypsum will genuinely improve structure. If the crumb sits there and the water stays clear, gypsum will do nothing and your money is better spent on compost.
Never work clay while it is wet. Digging or rotary hoeing wet clay destroys the structure and creates a compacted layer that takes years to recover.
Sand: the water repellency problem
Sandy soils across Western Australia, South Australia and parts of Victoria commonly become hydrophobic - waxy coatings on the sand grains make water bead and run off rather than soak in. Preparing a bed without fixing this simply buries the problem.
Test by pouring water on a dry patch. If it beads and sits for more than a few seconds, apply a soil wetting agent and water it in thoroughly before planting or mulching. Adding clay and organic matter reduces the problem permanently over time.
The phosphorus question for natives
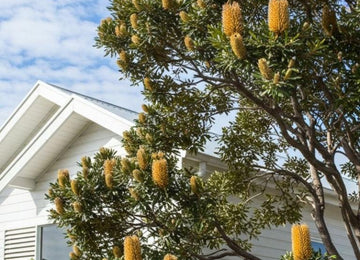
This matters before you improve anything. Australian soils are naturally very low in phosphorus, and Australian natives evolved accordingly - the Proteaceae especially, which includes grevilleas, banksias, hakeas and waratahs. They are damaged or killed by normal phosphorus levels.
Do not prepare a native bed with mushroom compost, fresh manure or general fertiliser. Use compost and a certified low-phosphorus native blend instead, and keep lawn fertiliser well away. Rich soil also produces soft growth on natives that struggles in heat and wind.
Prepare the whole area, not the hole
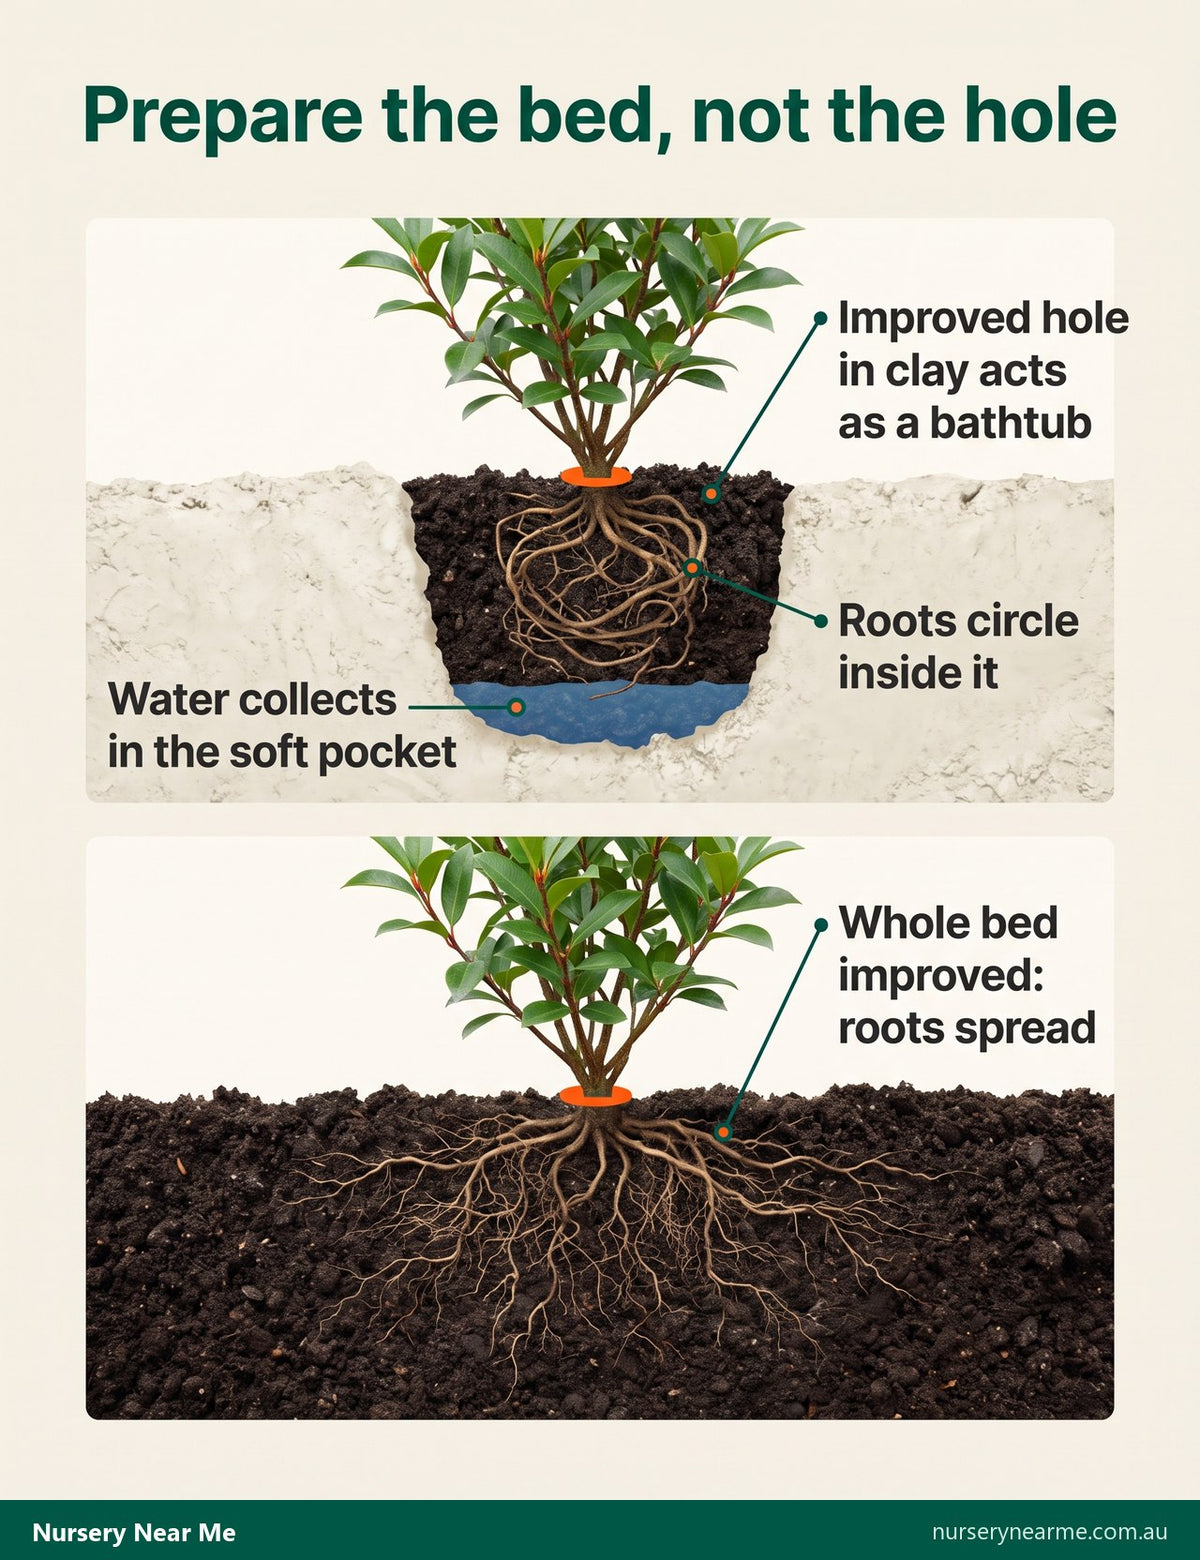
Digging a well-improved hole in unimproved clay creates a bathtub - water collects in the soft pocket and roots circle rather than spreading out. Improve the entire bed to a consistent standard, or on heavy ground build up rather than digging down and plant on a raised mound.
Timing
Autumn is the best preparation and planting window across most of Australia, giving roots the cool months to establish before their first summer. In Brisbane and the tropics, preparing before the wet season lets rain settle beds naturally. Avoid preparing and planting in midsummer anywhere.
Ready to plant?
Once the soil is right, the planting is the easy part. Browse our potting mixes, mulches and fertilisers for the compost, gypsum and mulch to get started, and read our guide to planting and care basics before the first plant goes in the ground.